Showing posts with label Chocolate. Show all posts

Wednesday, November 30, 2011

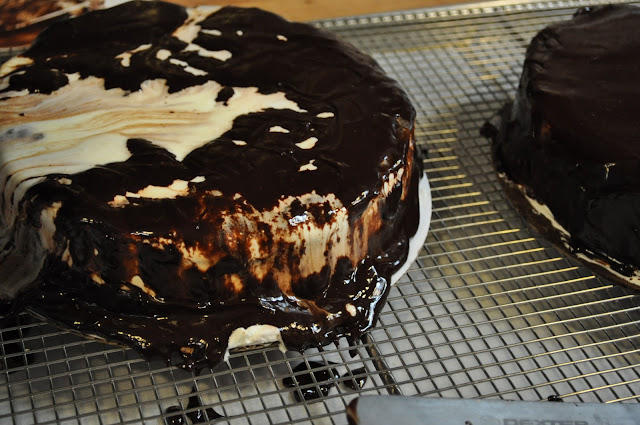
Cake Wreck Chocolate Cake

The best advice I could possibly give you, and forgive me if this seems glib, is to work. Work. Work. Work. Every day. At the same time every day. For as long as you can take it every day, work, work, work. Understand? Talent is for shit. I’ve taught school for nearly thirty years and never met a student who did not have some talent. It is as common as house dust or kudzu vine in Alabama and is just about as valuable. Nothing is as valuable as the habit of work, and work has to become a habit.
via chillit.htm

Some days things go horribly wrong.

I wonder if there is matter under my wild blond hair and between my big ears.

I love making old fashioned chocolate cakes. Two layers of moist chocolate cake, frosting to hold the cake together, ganache poured over the entire pastry and chilled. The result is a chewy layer of rich chocolate that encases a thoughtfully frosted cake.

Well, that is the intent of an old fashioned chocolate cake.

Needless to say things go horribly wrong sometimes.

For example, I frosted a perfectly honorable chocolate cake with a light whipped cream icing, all in a days work right? Toss it in the freezer and warmed a chocolate ganache in a double boiler. I had 15 minutes left on my shift, the last shift of the week, Friday. With 5 minutes left for the day I casually pulled the chilled cake out and set up a wire rack to pour the melted chocolate over the cake.

Only at the end of a day on Friday would this ever occur....

Whipped cream and hot ganache make a huge mess.

Did you hear me - don't be like the baker and melt a perfectly good cake.

What happened? I was left with a cake, you see above melting into a huge puddle of sweet disaster.

I kind of wanted to cry but I wanted to laugh even harder. I grabbed my camera and snapped a quick photo, then chef reminded me that the key to success is to be able to fix your mistakes. Believe it or not this massive disaster was saved.

One more good laugh with chef, no tears, I was out the door with yet another week of baking and "pastry school" under my belt.

Old Fashioned Chocolate Cake

Source, Chef Christy Fox
Makes 2, 8" cakes

This is a great everyday chocolate cake, it is the recipe that I use at the bistro and was handed down from the chef. Please note that there are roasted beets in the cake, they give the finished product moisture and a deep rich color. Simply roast a few beets in a bit of olive oil until soft to a fork, cool, peel, and puree.

4 ounces semi-sweet chocolate
4 ounces unsalted butter
1/2 cup sour cream
1 1/2 teaspoons baking soda
1/2 cup beet puree
2 cups sugar
1 teaspoon vanilla extract
1/4 teaspoon salt
2 eggs
2 cups cake flour, sifted
2 tablespoons cocoa powder, sifted
1 cup hot water

Pre heat the oven to 350. Line two 8 inch cake tins with parchment paper and oil.

Melt chocolate and butter together in a double boiler until smooth. Set aside.

Mix sour cream and baking soda in a small bowl and set aside.

In a mixer, combine sugar, vanilla, salt and chocolate/butter mixture. Mix until well combined. Add eggs, one at a time until just mixed. Do not over mix.

Add sour cream mixture and beets to the batter until just mixed.

Alternately add flour/cocoa mixture and hot water to the batter. Watch for lumps and mix until just combined.

Pour batter into prepared tins. Bake for about 20 minutes or until the the center of the cake springs back when your index finger lightly taps it or a tester comes out with only crumbs.

Cool and invert onto wire rack to cool completely. Frost how you wish!

Sunday, September 25, 2011

The art of caramel and world peace cookies


I bake for a living.

Or as J. jokes, brings home the dough.

Really? Pinch me.

Or at least I have hacked through a week of early mornings and just barely knowing enough about baking cookies to survive a week filling a pastry case meant for human consumption and not been told to take a hike instead. Seriously. I bake at least fifty little nibbles by six in the morning, people buy them. I only imagine that people eat the damn things or at least feed it to their dog or please just just let me know you compost for Pete's sake. Honestly, I think that I would eat anything that comes out of the oven so the shop is in pretty good shape because I am rather pickey.


Like with anything there are flops. Failures. Opportunities to learn.

The last two days I have been trying to make caramel sauce, a really large vat of camel sauce. It is not working. Just as the "boss lady" gently instructed me, I mixed two cups of brown sugar, two cups of granulated sugar, one cup of water and a few tablespoons of white vinegar in a pot with very clean hands. The mixture went on medium high heat, I watched for sugar crystallization around the edge of the bubbling sugar, brushed it down with a clean brush dipped in fresh water, carefully avoiding touching the liquid hot magma doing its canalization business with the bristles. I let it go. Heating. Bubbling. Smelling wonderfully. I prepped the the three cups of heavy cream and a few ounces of dark rum in another pot, letting it come to a full boil. Timing is key. When the sugar is at the appropriate temperature which is apparently gauged by smell, color, the ability to blow perfect bubbles with the caramel liquid through a slotted spoon and the final test of dropping a spoon full in a glass of water to make sure it forms a round ball by the time it reaches the bottom, the sugar has caramelized and can be removed from the heat, the boiling cream can be carefully added in small amounts while the other hand whisks.  Then it cools. Then you pour it over everything you see. Simple enough right?


Still learning!


Next week I promise I will understand caramel sauce and why it separates if done wrong, like this morning.

Did I mention that there is so much information out there. Like here and here. 

But I did make a cheese cake with marscapone, fromage blanc and cream cheese which is studded with orange zest and baked in a cinnamon graham cracker crust served with raspberry sauce to be served all weekend. BAM!

Dabbling with caramel sauce, learning to determine when cheese cakes are done without the aide of a thermometer, understanding the jiggle of creme brulee can be a wee bit intimidating for me at times. I second guess everything I do, every action, scrutinize every flavor. Then I turn to my favorite recipes, ones that work for me, things I like to nibble and the things that I love to share with friends. I made this cookie recipe, world peace cookies within the first few days in the kitchen, needing a boost of confidence.

Everyone loved them, of course.


World Peace/Korova Cookies
Paris Sweets, Dorie Greenspan
Smitten Kitchen
Makes about 36 cookies

1 1/4 cups (175 grams) all-purpose flour
1/3 cup (30 grams) unsweetened cocoa powder
1/2 teaspoon baking soda
1 stick plus 3 tablespoons (11 tablespoons or 150 grams) unsalted butter, at room temperature
2/3 cup (120 grams) (packed) light brown sugar
1/4 cup (50 grams) sugar
1/2 teaspoon fleur de sel or 1/4 teaspoon fine sea salt
1 teaspoon vanilla extract
5 ounces (150 grams) bittersweet chocolate, chopped into chips, or a generous 3/4 cup store-bought mini chocolate chips

Sift the flour, cocoa and baking soda together.

Working with a stand mixer, preferably fitted with a paddle attachment, or with a hand mixer in a large bowl, beat the butter on medium speed until soft and creamy. Add both sugars, the salt and vanilla extract and beat for 2 minutes more.

Turn off the mixer. Pour in the flour mixture, drape a kitchen towel over the stand mixer to protect yourself and your kitchen from flying flour and pulse the mixer at low speed about 5 times, a second or two each time. Take a peek — if there is still a lot of flour on the surface of the dough, pulse a couple of times more; if not, remove the towel. Continuing at low speed, mix for about 30 seconds more, just until the flour disappears into the dough — for the best texture, work the dough as little as possible once the flour is added, and don’t be concerned if the dough looks a little crumbly. Toss in the chocolate pieces and mix only to incorporate.

Turn the dough out onto a work surface, gather it together and divide it in half. Working with one half at a time, shape the dough into logs that are 1 1/2 inches in diameter. Wrap the logs in plastic wrap and refrigerate them for at least 3 hours. (The dough can be refrigerated for up to 3 days or frozen for up to 2 months. If you’ve frozen the dough, you needn’t defrost it before baking — just slice the logs into cookies and bake the cookies 1 minute longer.)

Center a rack in the oven and preheat the oven to 325°F (160°C). Line two baking sheets with parchment or silicone mats.

Working with a sharp thin knife, slice the logs into rounds that are 1/2 inch thick. (The rounds are likely to crack as you’re cutting them — don’t be concerned, just squeeze the bits back onto each cookie.) Arrange the rounds on the baking sheets, leaving about one inch between them.
Bake the cookies one sheet at a time for 12 minutes — they won’t look done, nor will they be firm, but that’s just the way they should be. Transfer the baking sheet to a cooling rack and let the cookies rest until they are only just warm, at which point you can serve them or let them reach room temperature.


Packed airtight, cookies will keep at room temperature for up to 3 days; they can be frozen for up to 2 months. They can also be frozen in log form for months, and can be sliced and baked directly from the freezer, adding a couple minutes to the baking time.

Monday, June 27, 2011

Chocolate Peanut Butter Brownies - The Mother Truckers


Peanut butter meets brownies topped with chocolate - Meet the mother trucker brownies.

Weekends that go by too fast - Mother Trucker! Why do they have to end?

Real jobs - Mother Trucker! What time suck.

Two too many cocktails - Mother Trucker, bad idea.

Finding a few more gray hairs - Mother Trucker! Is this really happening?

I know it is swim suit season and all but sometimes life is just a mother trucker and calls for brownies that pack a punch.

Brownies that keep their junk in their trunk.


There are job interviews, cats that scratch perfectly nice furniture, dirty dishes, folding laundry, an obscenely fat cat that likes to lay on your chest and stare at your mouth and lick ears, bills, decisions, uncertainty, cats.


Then there are mother trucker brownies and life just seems to make sense.

Brownies that have all of life's little naughtiness including chocolate, more chocolate, peanut butter, sugar, more butter, more chocolate. 


Pretzels on brownies, mother trucking brilliant!


Chocolate Peanut Butter Brownies (The Mother Truckers)

Adapted from Deb at Smitten Kitchen via Butterwood Desserts, West Falls, New York via Gourmet, October 2007

Makes about 32 brownies, depending on how small you cut them.

For brownies
2 sticks (1/2 pound) unsalted butter, softened
1 3/4 cups sugar
1/2 cup creamy peanut butter
1/2 cup creamy almond butter
2 large eggs plus 1 large yolk
2 teaspoons pure vanilla extract
2 cups all-purpose flour
1 1/2 cups dark chocolate chips
1teaspoon salt


For ganache
1 1/2 cups d chocolate chips dark
1/2 cup heavy cream
1 tablespoon unsalted butter, softened

Make brownies:

Preheat oven to 350 degrees F with rack in middle.

In a 13- by 9- by 2-inch baking pan, then line bottom of pan with parchment paper and butter parchment.

Beat together butter and sugar with an electric mixer at medium-high speed until mixture is light, white and fluffy, add peanut butter and beat until incorporated.

Beat in whole eggs, egg yolk, and vanilla. Reduce mixer sped to low, then mix in flour until just combined.

Mix in chocolate chips then spread batter in baking pan, smoothing out the thick batter.

Bake until brownies are deep golden and a wooden pick inserted in center come out with some crumbs adhering, 40 to 45 minutes.

Cool completely in pan on a rack, about 1 1/2 hours.

Make ganache:

Bring cream to a boil in a small saucepan, then remove from heat.  Pour chocolate chips into cream and let mixture stand for one minute.

Whisk in butter until it is incorporated, chocolate is melted, and a smooth mixture forms.

Spread ganache on cooled brownies and let stand until set, about 15 minutes.

Brownies keep in one layer in an airtight container three days or can be stored tightly wrapped in the freezer.

Wednesday, May 04, 2011

Best Cocoa Brownies


It went something like this:

Mom left for work, my younger brother and I were going to spend the morning at home together in front of the TV. Simple enough, we were not mischievous kids, leaving us at home from a early age was never a big deal, she was never gone for that long.


That particular sunny summer morning she was gone long enough for us to think that we needed brownies. We had mastered making lunches that consisted of microwaved quesadillas, Kraft macaroni and cheese. Brownies? Why we decided to make brownies is a mystery. Living in a rural area we could not sneak to the corner stare for treats, we were going to bake brownies. I am not sure how old we were when we tried to bake chocolate for the first time and neither does my mom because she never found out. I must have been school age because I did read the recipe and was slightly able to understand measurements.


Everything was going smoothly, I could reach the flour standing on a dining room chair, eggs, butter from the freezer all easily accessible. Chocolate... cocoa powder? What is cocoa powder? I got it, Hershey syrup, chocolate syrup will work perfectly. I did not understand substitutions nor that butter needed to be room temperature, not frozen solid.


We heated the oven, poured the "batter" with chunks of cold butter the size of marbles onto a bone dry cookie sheet and baked it. It baked and baked and baked, slowly turning into a smoking thick mess. When the house started to smell, we pulled the chocolate lump from the oven and my brother held the door open as we hid the evidence on the back porch.


It took me nearly 20 years to bake brownies from scratch again. I never fancied brownies, my taste buds scared from too many boxed brownie mixes that were too sweet and oil laden or deli counter pathetic frosted pucks. After thumbing through several recipes, reading numerous descriptions, I decided that it was time to conquer my fear of brownies and make a gooey brownie that was a close cousin to the chocolate cake that I adore. My life is forever changed and I have learned from my mistakes.


Best Cocoa Brownies
Inspired by SmittenKitchen - Adapted from Alice Medrich’s Bittersweet

Makes 16 larger or 25 smaller brownies (the size you see pictured yielded 6 for ease of shipping)

10 tablespoons (1 1/4 sticks, 5 ounces or 141 grams) unsalted butter
1 1/4 cups (9 7/8 ounces, 280 grams) sugar
3/4 cup plus 2 tablespoons (2 7/8 ounces, 82 grams) unsweetened cocoa powder (natural or Dutch-process)
1/4 teaspoon salt (or a heaping 1/4 teaspoon flaky salt, as I used)
1/2 teaspoon pure vanilla extract
2 large eggs, cold
1/2 cup (66 grams, 2 3/8 ounces) all-purpose flour
2/3 cup almond, walnut or pecan pieces (optional)

Position a rack in the lower third of the oven and preheat the oven to 325°F. Line the bottom and sides of an 8×8-inch square baking pan with parchment paper or foil, leaving an overhang on two opposite sides.

Combine the butter, sugar, cocoa, and salt in a medium heatproof bowl and set the bowl in a wide skillet of barely simmering water. Stir from time to time until the butter is melted and the mixture is smooth and hot enough that you want to remove your finger fairly quickly after dipping it in to test. Remove the bowl from the skillet and set aside briefly until the mixture is only warm, not hot. It looks fairly gritty at this point, it smooths out once the eggs and flour are added.

Stir in the vanilla with a wooden spoon. Add the eggs one at a time, stirring vigorously after each one. When the batter looks thick, shiny, and well blended, add the flour and stir until you cannot see it any longer, then beat vigorously for 40 strokes with the wooden spoon or a rubber spatula. Stir in the nuts, if using. Spread evenly in the lined pan.

Bake until a toothpick plunged into the center emerges slightly moist with batter, 20 to 25 minutes is Medrich’s suggestion but it took me at least 10 minutes longer to get them set. Let cool completely on a rack.

Lift up the ends of the parchment or foil liner, and transfer the brownies to a cutting board. Cut into 16 or 25 squares.


Eat half, stick the other half in the freezer for when the craving hits.... Or package them up and send them off!

Thursday, April 07, 2011

Chocolate Covered Cherry Cupcakes + Giveaway!


My Dad called me this morning. He wanted to talk about the weather.

I love it.


I pulled up a stool in the antique shop in where I was ogling cookie cutters and told him all about the sun and warm Spring days we have in the desert.

He was walking the beach, collecting treasures and explaining to me that his greenhouse is bursting at the seams with petunias and marigolds and it was going to rain in approximately 38.7 hours. We listen to these weather forecasts, he has an amazing way of predicting the elements. Seriously. He wanted to know about our sweet old black dog.


Life is chocked full of little blessings, like a phone call at 10:30 in the morning from my dad.


A friend from Bellingham called me yesterday on her way home from work just to say she missed me.


This little blessing brought tears to my eyes. She would probably lick the frosting off at least three of these cupcakes.  I miss her more than she will ever know.


I found an old love letter from J. tucked away in a book. I was worthless for a good 30 minutes after reading his tender hand written words.


Sometimes all it takes are some kind words, a simple hello to a stranger on the street, smiling as you make your way through town, a phone call to a friend just to hear their soothing voice or just to hear about the weather 350 miles away.


To seal the deal, to show them your real sweet side, bake a dozen cupcakes. Works like a charm.


Chocolate Cover Cherry Cupcakes.


Your relationship will go to new heights. Dense, hand held, cherry speckled cakes topped with a balanced chocolate butter cream. Chocolate covered cherries - cupcake style.


**TREAT TIME**


Totally inspired or high on sugar from Olvatine (which I eat with a spoon) and cherries from a jar, I made a fancy new card to go with the cupcakes. It is card #7 over here.


cheer·i·o (Exclamation). Used as an expression of good wishes on parting; goodbye. Used as a toast


 Here is the deal. Keep in touch. I will help. Leave a comment telling us one person you want to reconnect with, you don't even need to name people if you don't desire. I will randomly pick a commenter Sunday night and send them three of my personalized greeting cards to help you keep in touch. 

Thank you for your sweet comments!

Congrats Heather of Girlchef - I will send you a handful of fancy little cards to help keep in touch!

Chocolate Covered Cherry Cupcakes 

Adapted from King Arthur's Flour

Makes 12 standard size cupcakes

I decided to use a POM Wonderful's 100% Pomegranate Juice Concentrate to enhance the fruity flavor of the cherry speckled cake. The deep dark pomegranate concentrate imparts a pink hue through out the batter, making it a natural food coloring. The flavor works a bit of magic with the cherry and both pair well with chocolate.

3/4 cup sugar
1/4 cup chopped maraschino cherries
1/4 cup unsalted butter, softened
2 tablespoons vegetable oil
1/4 teaspoon salt
1 teaspoon baking powder
1/4 teaspoon baking soda
1/8 teaspoon almond extract
3 tablespoons POM Wonderful's 100% Pomegranate Juice Concentrate
2 large eggs
1 1/2 cups all purpose flour
2/3 cup milk, room temperature

    Preheat the oven to 350°F. Grease a 12-cup muffin pan, or line with papers.

    Beat the butter and sugar in a stand or held held mixer until the batter lightens in color and texture, about 90 seconds.
     
    Add the oil, and beat until the mixture is light, around 60 seconds. 
     
    Beat in the cherries, salt, baking powder, baking soda, almond extract, and pomegranate juice concentrate until combined. 
     
    Beat in the eggs one at a time, scraping the bottom and sides of the bowl after each addition.
     
    Gently beat in the flour, alternating it with the milk.
     
    Divide the batter among the cups. Bake for 16 to 18 minutes, until cupcakes are very light brown and test done with a cake tester.
     
    Remove the cupcakes from the oven and after 5 minutes, transfer them to a rack to cool completely.


    The Best Chocolate Butter Cream Frosting

    Straight from the mouth of Joy the Baker

    Check out the secret ingredient... This recipe will make double the amount of frosting you need for the above recipe. Double the cupcake recipe or save the rest of the frosting in the fridge for another adventure.
    makes enough to frost 24 cupcakes or one 8-inch layer cake
    1 1/2 sticks (3/4 cup) unsalted butter, softened
    1/2 cup unsweetened cocoa powder
    1/2 teaspoon salt
    2 1/4 cup powdered sugar, sifted
    1 teaspoon pure vanilla extract
    2 tablespoons milk
    1/2 cup heavy cream
    1/3 cup Ovaltine
    Cream together butter, cocoa powder and salt. Butter mixture will be very thick. Turn off the mixer, scrape down the sides of the bowl and add powdered sugar. Turn mixer on low and mix in powdered sugar while adding milk and vanilla extract. As the sugar incorporates, raise the speed of the mixer to beat the frosting. Beat until smooth. In a 1-cup measuring glass, stir together heavy cream and Ovaltine. Turn mixer speed to medium and pour cream mixture into frosting in a slow, steady stream, until you’ve reached your desired consistency.  You may not need the full amount of Ovaltine and cream.  Spread or pipe onto cupcakes. 


    ** POM Wonderful's 100% Pomegranate Juice Concentrate was provided courtesy of POM Wonderful**

    Thursday, March 31, 2011

    Dark Chocolate Toffee Crisps


    It happened to me again. I am going all old school on you. Really one of classier moments and creations.

    Remember these? Well I have gone above and beyond. These, my friends, are beyond better.


    Someone said teenage mutant ninja turtles and then I heard a conversation about what those awkward young hosts of outdated Nickelodeon shows we used to veg out to are doing now, Neil Patrick Harris was the topic of debate late one night. High brow conversations.

    Then I spotted a box of saltine crackers in the cuppboard. Hell broke loose in the kitchen because of crackers. This happens sometimes.


    I used to sit down and eat sleeves of saltine crackers and watch hours tv. Real story. Saltine crackers remind me of Nickelodeon and my childhood.


    Flash back.

    Call it a corn syrup flash back of sorts. That is all I had - I was 10! There is probably research to back up my case that HFCS causes these sorts of ridiculous behaviors.


    Next thing I knew I was in the kitchen

    making the perfect

    - in the over the top sort of way -

    snack for the next hour that I was about to lose watching Doug, The Adventures of Pete and Pete, and Guts.


    Totally guilty pleasure. You have to give in.

    Up Town shopping center in Richland, WA. Home of the Bombers. Classy place.

    For lots of you in this wind ravaged, dust bucket, treeless high dessert of Washington that we live in, it is your Friday and are the recipients of this batch of goodness. It is your much deserved long weekend. Call it my treat to another week down and one step closer to keeping us from nuclear contamination. Keep up the good work....


    Dark Chocolate Toffee Crisps

    Adapted from another flash back


    Use your imagination. Omit the toffee chips and top the melted chocolate with almonds or coconut...

    • 1 sleeve (40 saltines in a package) saltine crackers
    • 1 cup butter
    • 1 cup brown sugar
    • 1 package (326 grams) dark chocolate chips
    • 1 package (326 grams) toffee chips
    Optional toppings:
    • 1 cup slivered or sliced almonds (lightly toasted)
    • 1 cup shredded coconut
    Preheat the oven to 400 degrees

    Line an 11×15 inch rimmed cookie sheet with parchment paper or foil. Evenly distribute the crackers in a single layer over the parchment paper.

    Mix butter and brown sugar in a medium sauce pan and bring to a boil. Stir for 5 minutes while boiling on low.

    Immediately pour  the butter/sugar mixture over the crackers, spreading evenly. Bake for 5 minutes.

    Remove from oven and sprinkle chocolate chips evenly over top; let stand for 5 minutes, then spread melted chips evenly over all. Cool completely (I tossed mine in the freezer). Heat the toffee chips until smooth (microwave in 30 second bursts) and smooth over hardened chocolate. Cool completely.

    Cut or break toffee into pieces.

    Store in an airtight container. I liked mine best cold from the fridge.

    Friday, February 11, 2011

    Chocolate Covered Chocolate Cookies


    So I made you some cookies.


    Sometimes a girl needs chocolate - lots of chocolate. And cookies. This is the truth. I made the cookies for me but plan on sharing the simply brilliant recipe with you and sending the rest off to some of my favorite people.


    Some times my brain hurts, it gets tired and needs fuel, I usually try to reach for some almonds or some green tea but today I reached for the cookies. First the batter, then an unfrosted cookie, some melted chocolate, then the final product. My brain needed chocolate cookie fuel, not health food.

    It has been a long time since I have worked. Worked at a real job, one that gives you W-2's and that sort of thing. Time just seems to be slipping away. I have a sweet little life in which I do the things I love on a regular basis. I have my routines and it works, until it doesn't. At this point I usually make cookies for breakfast. Normal right?


    Sometimes life throws sticks in my spokes and I crash. It is cool because I am learning how to properly crash, shake it off and get right back up, pedaling at full speed.

    What do I have to show for all my time off? A new found love of writing, lots of time with the dog, bike rides, hikes, new recipes, books read.... good stuff. I haven't gone on any magnificent trips, learned how to salsa dance or took classes on photography or cooking or this self defense class that I have to take to fight back. Am I wasting my precious time or am I just truly being me? Am I getting soft?

    It is one of those days, the point of rapture, I come up from my little bubble floating on a cloud and ask what it is exactly that I am doing. What do I have to show for myself?

    Where is the line? At what point do we throw out our everything that we previously held to be true and try something totally different. Well, I am not a drastic person and this will never happen, so what do I change? I suddenly and slightly overwhelmingly feeling that I am going in the right direction but not at the right speed. The direction is nice, soft, pleasant and easy. I am one for things that make me feel good and satisfied, my life is wonderful right now but how could it be better?


    Am I pushing myself to the fullest potential?

    Do I just have the baby fever?

    What do I do?

    Here is the cookie recipe because now I probably made your brain hurt too.


    It is Friday, have fun, eat a cookie or two, have a glass of champagne, be in love with something and someone, figure out my life, then lets talk.

    Chocolate Covered Chocolate Cookies

    Inspired by Joy the Baker

    The dough needs to be chilled for at least 2 hours. This is science. It tastes better and is much easier to work with. I put mine in the fridge for 48 hours. The taste is spot on, between 2 and 48 hours will work. I formed the first batch into a log and sliced off disks. I would totally recommend rolling this dough out nice and thin (1/4 inch) and use a cutter of your choice.


    1 cup whole wheat flour
    1/4 cup plus 2 tablespoons all-purpose flour
    1/4 cup plus 2 tablespoons cocoa powder
    1/4 teaspoon salt
    1/2 teaspoon baking powder
    1/2 cup unsalted butter, at room temperature
    3/4 cup granulated sugar
    1 tablespoon molasses
    1 large egg

    1/2 cup chocolate chips

    Preheat oven to 350 degrees F.  Line two baking sheets with parchment paper and set aside.

    In a medium bowl, whisk together flours, cocoa powder, salt and baking powder.  Set aside.

    In the bowl of an electric stand mixer, fit with a paddle attachment, beat together butter, molasses and sugars until combined. Add the egg.  Beat on medium speed until mixture is fluffy, about 2 to 3 minutes. Whip it, Whip it good!

    Stop mixer and add the dry ingredients all at once.  Mix on low speed until all of the flour is incorporated, do not over mix.

    Scrape the batter into a large Ziploc bag. Close the bag, leaving a, inch opening, smash the dough flat until it fills the bag. Seal the bag and chill in the fridge for at least 2 hours.

    Once chilled, cut the bag off the dough, forming two flat rectangles. Place one half on a lightly floured surface. Roll the dough to a 1/4-inch thickness.  Use a cookie cutter to cut out cookies and place dough on prepared baking sheet. 

    Bake for 10 to 12 minutes.  Remove from the oven, allow to rest on the baking sheet for 10 minutes before removing to a wire rack to cool completely.

    Melt chocolate in microwave until smooth, drizzle over cookies. Allow chocolate to harden before storing. Lick the chocolate spoon and cup clean.

    Cookies will last, in an airtight container at room temperature, for up to five days.